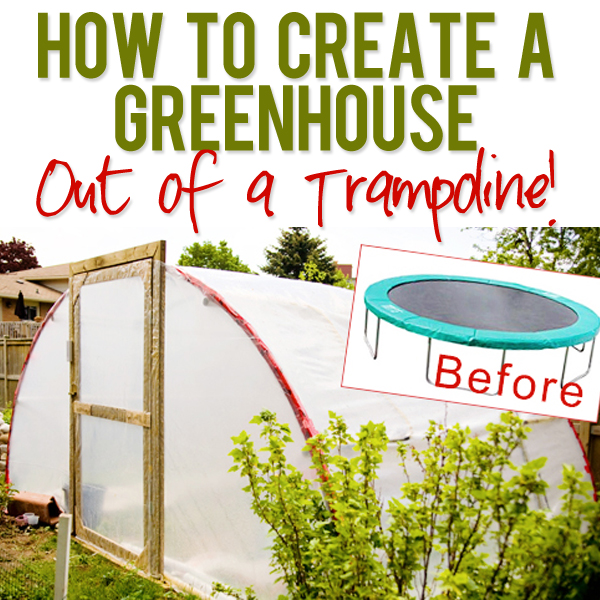
Hello Ladies! Today I’m excited to tell you about the most creative DIY gardening project I have seen. I think it’s so neat when people think of ways to turn something old into something new, and I was amazed when I heard about my mother-in-law’s plan to turn their trampoline into a greenhouse!
She told me that they were planning to get rid of their (aging) trampoline but she just kept feeling like there must be a way that she could use the galvanized steel frame for something. She was right- check this out!
So, today I’m going to tell you how my in-laws created a greenhouse out of a trampoline for about $100!
Here’s what they used:
– Trampoline Frame
– Piping ($2/tube, they bought 10)
– Wood ($20)
– Thermometers ($2)
– Red Tape ($11 for the roll)
– Plastic ($60)
– Screws ($5)
(That’s a grand total of $98!)
In the photo below you can see how they screwed the pipes/tubing onto the trampoline frame with an electric drill. They bought central vacuum tubing (it was cheaper than plumbing pipes). They were probably about 2″ screws.
In the photo below, you can see how they used half of the frame for each side/end of the greenhouse. No cutting of the steel required- just pull the frame pieces apart so that you’ve got 2 halves of the frame, and you’re good to go! Turn them so that the “legs” of the trampoline point toward the inside of the greenhouse, and that gives you something to screw the tubing to!
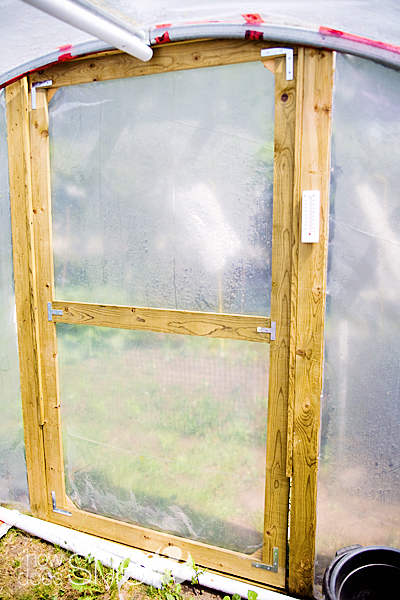
My father-in-law built the frame for the door out of wood and screwed it to the frame of the greenhouse:
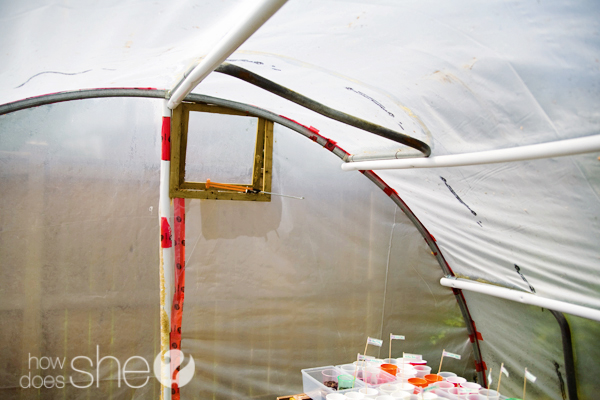
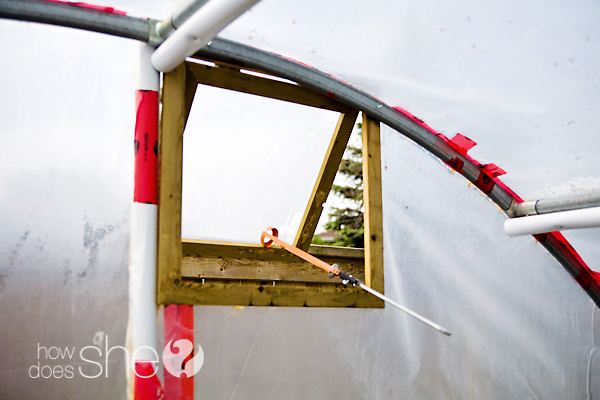
(There is also a small window on the opposite side of the greenhouse.)
They attached the plastic (which you can get at Home Depot and is technically called 6mm Poly Film) to the outside of the frame with red tape called “Sheath” or “Sheathing Tape”:
Note: My mother-in-law suggests repurposing the mat from the trampoline, using it as a floor for your greenhouse. Unfortunately theirs got thrown out, so they’re going floorless for now. 😉
They tried using some caulking that was supposed to work for metal & plastic to secure the plastic to some other parts of the frame, but it didn’t work. They did find a good use for the caulking gun though- it’s great for propping the window open for air flow! 😉
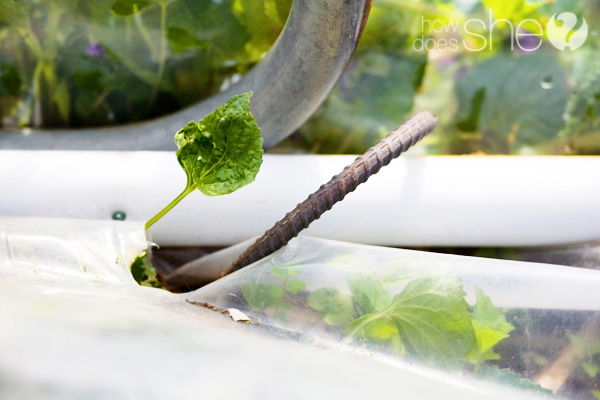
After having the greenhouse assembled, we had a really windy couple of nights. Windy enough that they woke up one morning to find that the greenhouse had been relocated- right over their little pond! To prevent that from happening again, they bent some rebar, and anchored the bottom of the frame to the ground like this:
Now for the inside of the greenhouse!
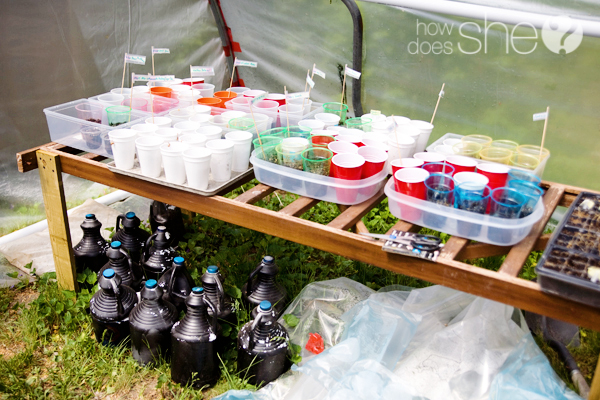
This is the first summer of the greenhouse, so everything is still experimental. This is what the contents of the greenhouse look like at this point:
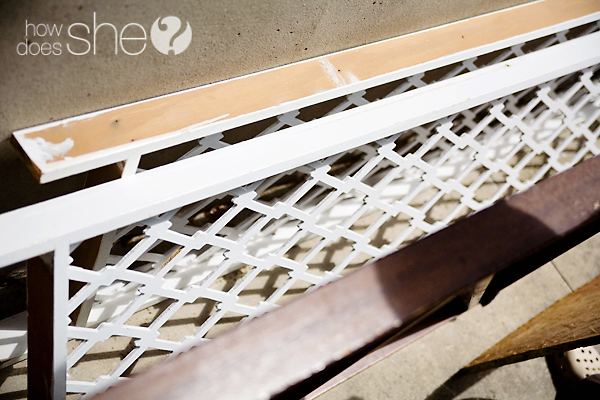
That little table that they’re using to keep their plants on? They repurposed the frame of an old futon to make that! And they’ve got some pieces of lattice that they’re planning to use to make another one:
Did you notice the black jugs on the ground a couple of photos up? Those are bleach jugs that have been spray painted black. They’ve got water in them. During the day the water heats up, and during the night, they create extra warmth inside of the greenhouse!
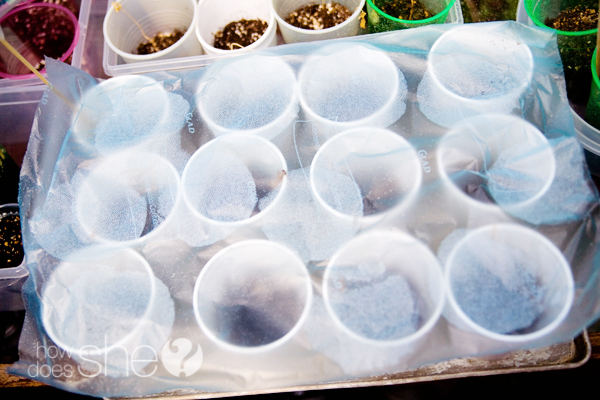
This “press ‘n seal” plastic wrap works as a way to seal in moisture for some of the plants:
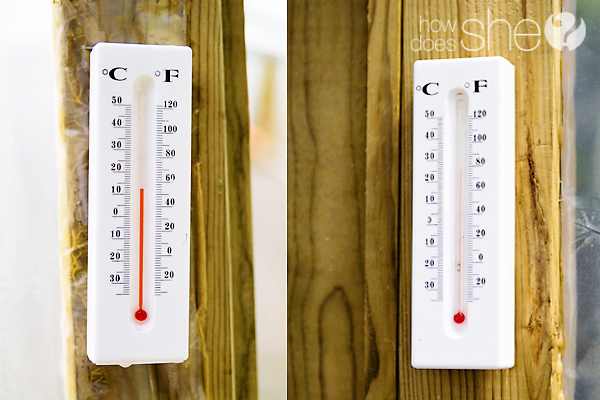
And these indoor/outdoor thermometers (that were 99 cents each) show the difference in temperature on the inside compared to the outside of the greenhouse. Here’s what the temperatures were when I was over there:
I’m totally impressed with their creation and excited to see how this first Summer goes! They’re still learning things as they go (for example, they’re thinking they may need to add another window for more airflow).
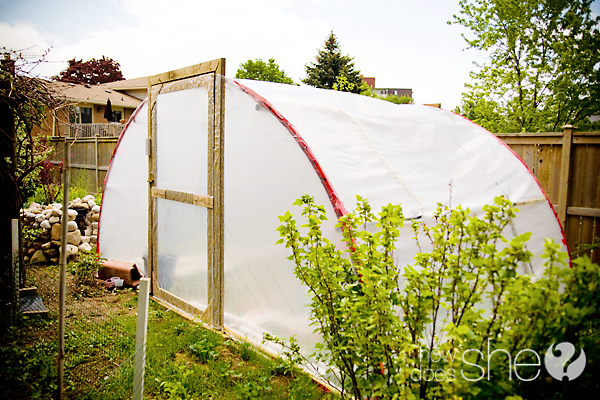
The finished creation is about 8 feet by 12 feet. The trampoline they used was a 15 foot trampoline, so it was 7.5 feet high, but they sort of squished it to get a bit more height. 😉
Have you ever repurposed something old into something really cool & new? 🙂
What’s the most creative gardening project you’ve tried or seen?
I hope this post got some of your creative juices flowing and gets you excited to think about more gardening ideas!
I’d love for you to visit me over at Raising Memories this week to see what fun things we’re up to (but you won’t hear about gardening- I’m afraid I have very little garden space after a failed attempt last year because of not enough sun in our little yard… that ended in laying sod over our poor little failed garden!)







Alison says
Holy SHmoly! This is cool. I would have never thought to use the frame! Nice job Heather. WHoo Wee!
Heather Lynne says
Isn’t it such a great idea? I was so impressed! 🙂
Shelley says
Talk about some SERIOUSLY cool repurposing!! This is awesome.
Heather Lynne says
Thanks Shelley, I was so impressed when I found out what she wanted to do, and now to see it all finished- it’s so cool! 🙂
Heather says
Awesome idea! I have a smaller greenhouse, but never thought of using the black bleach bottles to heat up water…that is a great idea! Thanks for the post and tips!
Heather Lynne says
Wish I could take credit for these awesome ideas, but you’re welcome for sharing them! 😉
Rachelle says
Pretty impressive! She’s got the brains, Dad has the muscle. lol 🙂
Heather Lynne says
They’re a good team! 🙂
Kari-Ucreate says
No way Heather! That’s just RAD!
Heather Lynne says
Thanks Kari 🙂 I was so impressed that she thought of doing this!
Elizabeth A Malone says
How do I print directions for the greenhouse?
Heather Lynne says
Hey Elizabeth, you could just copy & paste this post into your word program. Does that help?
Christi {Jealous Hands} says
That may be the most ingenious thing I’ve ever seen – and now I want one! I don’t think I’ll be able to talk my boys out of their trampoline… 😉
Heather Lynne says
Haha Yes, it might have to be an old trampoline that’s ready to go 😉
Yesterday someone on facebook asked me: “but can you still jump on it?” haha 🙂
GrannieEv says
That is seriously one of the most impressive repurposing ideas I’ve ever seen … I wish them much luck and enjoyment.
Heather Lynne says
Isn’t it crazy neat?! 🙂 Thank you 🙂
Debbie Patt says
A few years ago, my husband and I created a floor lamp out of 3 hockey sticks! We used the curved parts for legs, and used 2 hockey pucks in the center to screw the hockey sticks onto. We wired it with wiring from an old lamp that had cracked, and then just had to purchase a lampshade. The teenager we made it for was so excited, and everyone thought this was creative way to recycle old hockey sticks for a huge hockey lover!
Heather Lynne says
Debbie, that is SO COOL! Did you take pictures of it??
Missy says
I love repurposing ideas – this is crazy cool. Thanks for sharing!
Heather Lynne says
🙂 You are so welcome 🙂
Jedda says
My dad created one similar to this, and wrote directions on how to make and maintain it. He wasn’t lucky enough to have a trampoline frame to start with thought 😉
He has a lot of garden info on his sight along with this “tunnel.”
http://garden.uvci.com/Garden/High_Tunnel.html
Heather Lynne says
That’s really cool, Jedda! Thanks for sharing that link!
Pamela says
What a clever idea! Unfortunately our trampoline is still in full use as a trampoline…
Heather Lynne says
If only we could find a way to use it both ways at once 😉
Hilary says
VERY interesting. What a creative duo they are.
Heather Lynne says
🙂 Indeed!
Jenn S says
This is really cool. We just made a greenhouse last year out of poly and wood too, but I would have never thought of this. Great idea 😉
Heather Lynne says
Thanks Jenn! 🙂
Michele N says
Okay, I love this! We just took down our trampoline about a month ago because the mat has a 2′ tear in it. My hubby tried to figure out what he could possible do with the frame, he wanted a hammock out of it, but couldn’t figure it out. I love this idea unfortunately we’ve already put rock & a fire pit where the trampoline was or that would be an awesome spot for a greenhouse. I’m trying to come up with a greenhouse, but this might be a bit big but will definitely pull the trampoline pieces back out & look at it again. Thanks for the inspiration!
Heather Lynne says
You’re welcome! 🙂 Thanks for taking the time to comment here, and good luck with your greenhouse- I hope you can pull something off with your frame! 🙂
Kare says
FABULOUS!!
Karen says
This is one of the most clever repurposing projects I have ever seen. When our trampoline has lived it’s life and my kids no longer want it, I am making this!
Heather says
This is awesome!! A definite possibility for us. I have seen other greenhouses that have the bottom open in the summer. I assume it’s to allow the greenhouse a reasonable temperature. Does anyone know if that is a must?? Thank you!!
Heather Lynne says
Well, all I can tell you is that my mother in law (whose greenhouse is shown in the post) has been experimenting throughout the summer with leaving parts of it open because at first, some of her plants were cooking! She has ended up leaving the door open a lot of the time, for more airflow.
Kathleen says
This is a great idea. We ended up with a trampoline given to us for the grandkids, however we have a pool also and I’m hesitant to put up the trampoline thinking the grandkids are going to use it to propel themselves into the pool!! Now I know what I can do with the trampoline. Probably saved me alot of $$ in hospital bills!!
Robert Valiquette says
Wow,Super idea.
I scored a 24 foot aboveground pool with torn liner on bulk garbage day a few years ago. Used the liner for weed barriers and a small pool for the ducks to play in after patching tears and lining with clay soil to avoid ducks claws tearing it. The frame was added to my “One day I find use for this” pile. Well I see that it can be easy to use to build a simmilar style greenhouse. 12 ft wide and 12 ft high, perfect for starting my garden plants and season extending. As the piping is 2 inch diameter, I can connect 10 ft lenghts of ABS piping and still have a solid frame to work with. Thank you for the food for thought.
Heather Lynne says
You are welcome! Good luck with your project! 🙂
Sam says
Very cool! But your math is off. It cost $118 to make. Still very cheap though! Great recycling idea!
Heather Lynne says
Oops, you’re right!
nicole says
How much plastic did it take and what size pvc pipe did you use. I am going to do this next week.
Anne@DesignDreams says
Love it! What a creative idea!!!
Heather says
Very cool – what a great idea! I love it!
Jennifer G. says
What a very cool and creative recycle – love it!
Loretta says
I just made this! I have bouncy kids and our trampoline just ripped, so I went out and got another one on craigslist. I had the frame and ripped bouncy floor lying around. I originally thought I would try for a very cool clothesline made out of the frame. While looking for ideas… I found this page. I have ALWAYS wanted a greenhouse. Now I have one. I live on a farm, so I found a lot of wood lying about and some metal tubing. I left the legs of the trampoline intact except for the base part. I stuck 5 foot pieces of metal tube through the leg posts and screwed them together. So my frame is all metal. with a 2×6 and 2×4 base holding the legs in a square. Today I am going to make a door and a window. I will buy the poly and tape after payday. Did the tape hold the poly well long term? We live in Central Ca… our temps at the coldest (only once in a while) can dip to 22 degrees. We are usually 40 to 60 degrees in the winter. I so hope I can try for winter tomatoes. I do not want to use a heat source other than water bottles though. Maybe and incandescent light bulb. Hoping it is possible. Otherwise I will have a great seed starting place.
Heather Lynne says
Hi Loretta! It is so fun to hear that you are doing this!! I passed your message on to my Mother In Law (she is the one who built the greenhouse- I just blogged about it 😉 Here is her response (hopefully it will be helpful to you as you continue work on your project) :
The tape is holding well! and it’s been up for two seasons now. Is that two summers one winter? Not sure and , don’t really care! 🙂 I have seen a few edges beginning to pull up. I think it’s because the heat of the sun has cooked the sticky adhesive right off the tape.
Did she send you a picture? I like the wood idea. Our vacuum poles are a little droopy now and we’ve talked about needing some bracing of some kind. Snow gets heavy and adds weight to the structure. The poly film plastic covering is still good everywhere though. The water bottles only help hold the day temp into the night not heat the place up. Light bulb is a good idea for sure.
I need another window. thinking a “fly” (made of the same film and laid and held a few inches above the frame with something, wood?) over the top to cover the roof which I could then cut “windows” or “vents” into. That way the heat can escape rain stays out but bees can come in.
Also, if you have a photo of your greenhouse, we would love to see it! 🙂
~Heather
Patricia says
I love this idea! I think my dad still has our old trampoline. Maybe I’ll see if I can get it from him. My sister and I share a garden plot and to save on space we took an old swing set frame, removed all of the swings, and we hang out tomato plants upside down from it. We have also started saving our used tires to put under it for more planting space. So far it works great.
About the green house. Do you think it would hold up to snow?
Heather Lynne says
Patricia, they’ve used it through a few Canadian winters, so yes! My mother-in-law mentioned that they have made some alterations to help with snow. Here’s what she said about that: “We did add some concert mesh pieces (they bend just enough along the trampoline frame and give strength so the snow doesn’t melt and make huge roof puddles) by stapling and tying them to the frame to support the plastic roof.”
Dana says
Wow – amazing! Now that is ONE way to make use of an old trampoline. Very creative! Thanks for sharing!
Diamond says
You’ve got some pretty ingenius in laws there ! Who would have thought an old trampoline could be upcycled that way ?
Jeri says
Oh My Goodness!!! This is fantastic. I think I might be able to do it. My neighbor had a Old Trampoline in back yard. Goodness I will have to look tomorrow, I believe it was broke, hope they haven’t thrown it away. I will look immediately tomorrow morning as it is night time here now. I see where you had to had pipe pieces? Didn’t exactly understand. Not you Dear Me, hahaha just Dyslexic. hahaha now if I can figure out how to print it. Thank you so very much. God Bless you and Yours. Jeri
Pieter Kemp says
Hi. We used you example and built our own hoop house. Thanks for the inspiration!
Heather Lynne says
That’s so cool! I’m glad you found this post useful! 🙂
Curtis Smith says
This is awesome. I got the idea of using a trampoline for a greenhouse last summer and it has stuck in my head. I just started on it yesterday 3/14/16. You have answered a lot of hidden questions. I will post it when I am completed. Thank you
Carolyn says
This is a fantastic idea! We have an old trampoline in the yard that the kids have out grown (not to mention, one broken ankle). I was wondering how your in-law’s have made out with their greenhouse, it’s been in use for a couple of years ? How well did it stand up to the elements and is it still “growing” strong?
Heather Lynne says
Hi Carolyn!
When I saw your comment, I asked my mother-in-law for an update and she sent an email with a bunch of information for you! 🙂 Here’s her report on how it’s been going and what changes they have made:
“I would say that the greenhouse is growing strong. Maintaining a cool enough temperature is the main issue for growing in it in the summer. My raspberry plants (just outside the greenhouse) are migrating into it they love the shelter and warmth i guess and the berries they produce are really good, but I keep digging them out and transplanting them or giving them away.
Tomatoes seem to like it and do very well in it.
We did add some concert mesh pieces (they bend just enough along the trampoline frame and give strength so the snow doesn’t melt and make huge roof puddles) by stapling and tying them to the frame to support the plastic roof. And we changed out the PVC pipes for wooden 2×4’s that gave us our length because the pipes were bending. Seems to be good. We did re-skin the dome with new plastic after 3 years, and we’ll have to patch that this year because a table I was using as a grow table had a leg give way and the corner of the table has leaned into the plastic wall and really stretched it to nearly tearing it.
I got some cast off carpeting strips that I am going to put down on the dirt floor. I really want to fix the air flow though so it’s not so hot. It’s almost always around 100 F inside.
I added our two plastic laundry tubs (with out legs) as planters and the tomatoes are doing well in them. I have string hanging down from the wooden roof ridge and am using that to train the tomatoes to grow vertically without cages. No fruit yet on them,just flowers! I also have potatoes, sweet potatoes, turmeric, ginger, strawberries a few squash plants and a planter full of beans growing well. Every time I had a berry or two, a critter ate them before we could! May need to create a screen window cover for them next year.
My husband made me two “wicking beds” as seen on you tube and they are great! I have only watered from the top once, when I planted the plants! And they are doing well.”
Emily says
Do you have more specific instructions for this project? I would love to gather the materials and steps together for a christmas gift for someone!
Hex says
Smaller trampoline frames can be used to make tomato supports and netted fruit cages. You can wrap poly or fleece around them as a windbreak. A worthwhile upgrade for a trampoline frame greenhouse is to fix “wiggle wire channel” to the hoops and base., It will conform to the curves and makes fixing the poly to the frame very easy.
Shannon says
Where are the extensive plans on how to build this and the amount of materials?
Richard says
Instead of using the plastic pipe, I’ve seen others who removed the legs and replaced with chainlink fence top rail (it fits right in where the legs attached). Just a little bit more expensive and a whole lot stronger.