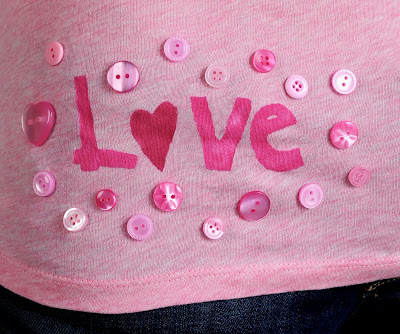
Hi! I’m Amy, from Mod Podge Rocks! – and I love . . . you guessed it . . . Mod Podge. How Does She was kind enough to invite me to guest blog, and I’d like to show you a craft “hack.” It’s a much less expensive way of doing screenprinting (over the traditional method), using none other than Mod Podge! Some of my favorite decoupage projects involve fabric, and this is no exception.
If you want a lot of detail, then this probably isn’t for you – but it’s great for simple designs, party favors (especially for kids!), decorating onsies, canvas totes and more. There’s no limit, really. Here’s what you are going to need:
Whatever you want to screenprint – shirt, bag, etc
Embroidery hoop – doesn’t matter if it’s wood or plastic. Needs to be just a little larger than the design
Sheer curtain panel – I got mine for $1 at the dollar store
Screen printing ink – any kind or colors, Speedball is great
Mod Podge – I used Fabric
Flat paint brush
Sheet of paper, any kind
Pencil or pen
Scissors
So I started with a t-shirt. So many stores are having smokin’ deals right now because times are tough – I got this baby for over 50% off and I love it.
Speaking of love, I decided with Valentine’s Day approaching I wanted to do the word “Love” – suitable for the major holiday but also perfectly acceptable to wear other times. You can print something up on the computer or just hand draw it like I did. If you mess up, just fix it (um, just like I am in the photo).
Put your curtain panel in the embroidery hoop and pull TIGHT. Cut around the edge. Guess what? You have a big curtain panel, right? You have enough for several more projects, which is pretty cool.
Once you are done cutting, pull tight again. TIGHT!
Place the embroidery hoop down on your design and trace with the pen or pencil. I was a little nervous that the pen was going to leak into the finished design, but I took a chance and it didn’t – call me your guinea pig.
Yay, my favorite part! Using the brush, paint Mod Podge on your screen where you DON’T want the ink to go through. This is called the “resist” because it resists the ink coming through the screen. I thought about it long and hard, and I decided to use Fabric Mod Podge. Why, because if it’s washable, then it would be easy to wash the ink out (Mod Podge staying behind) and then use the screen again for multiple prints. I know, I know – I’m smart.
Let your Mod Podge screen dry for a few hours until it’s completely clear. I did a few layers of Mod Podge because I was nervous about the ink getting through in some areas if I didn’t do it well enough. Your host is also a neurotic screen printer.
Now you are ready to paint. I mixed white with red to make a few shades of pink – the colors you see above. DON’T FORGET to place something in between the layers of fabric before you start! Screenprinting ink will bleed.
When you paint, dab onto the screen and stroke slightly. You want to make sure to get the paint through the screen well and have enough paint to do the job. Make sure to get the edges. Lift the screen up immediately.
Voila! You have a nice little design. You may have some funky edges, but it’s okay – I just had a little part of the heart I had to touch up with the brush. Easy! Let dry for at least 24 hours, and then add some embellishments as you choose. You’ll see I added some buttons for flair. Now I can mass produce these babies if I want to! I hope you enjoyed. This method is a lot easier than fabric painting, especially if you have a shaky hand like yours truly.
THANK YOU to How Does She for having me! Swing by Mod Podge Rocks! any time for inspiration, how-tos and general tomfoolery. I post nearly every day, and I’d love to meet you. See you soon!
Beckie says
I love Amy! Great guest post! I have yet to try screenprinting with MP but I most certainly will try someday.
Chacoy says
L-O-V-E It, can’t wait to try it;}
Thanks for sharing!
Mod Podge Amy says
It was so fun to do – thanks for featuring me!
Johnnie says
That is just cool. I am a fan of Mod Podge projects involving… well anything, but especially fabric. Thanks for sharing. New project on my list.
Ali says
This is such a great tutorial! I’m excited to make team t-shirts for our upcoming Cystic Fibrosis walk!