DIY Canvas Prints
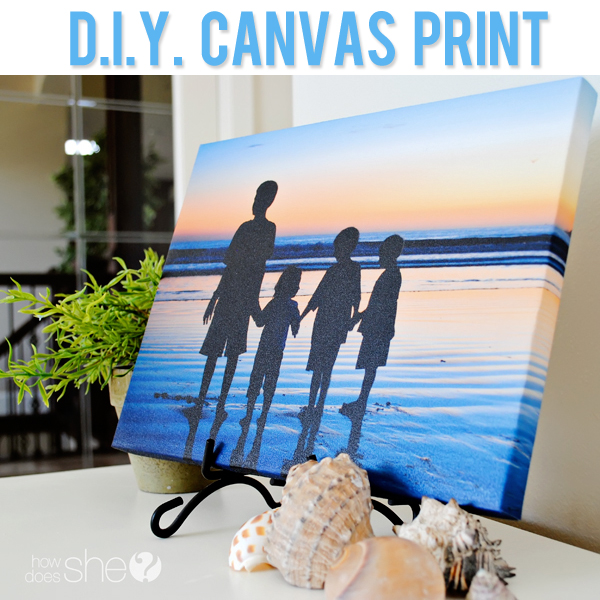
I LOVE the look of canvas prints…but, I haven’t been able to persuade my frugal little self to actually pay for them. Then, along came this idea. It was inspired by my super crafty sister in law. She’s amazing, really. And after seeing what she did with her family photos…I thought to myself : “I wonder if you could wrap your own photos onto canvas?“….turns out…YOU CAN!!! Let’s get to the DIY Canvas Prints.
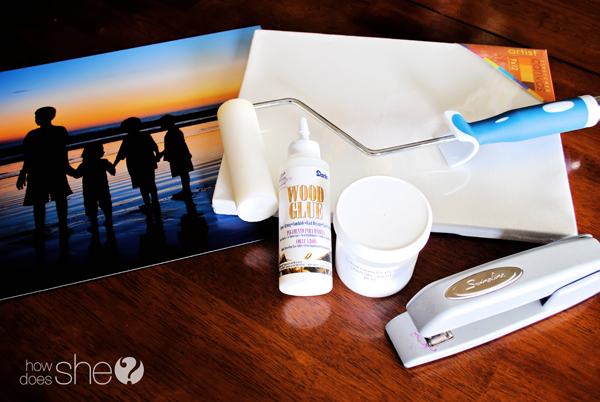
Here is what you will need:
–CANVAS 2″ smaller on each side than your actual photo. For example: my print is an 11×14 and my canvas is a 9×12. (So if you wanted a 10×10 canvas you would print a 12×12 photo)
–PHOTO 2″ larger on each side than your canvas. Be sure that your photo is printed primo quality. Seriously, it makes a difference. I get mine printed at The Imaging Depot…they are awesome!
–WOOD GLUE (make sure it’s the white wood glue…NOT the yellow stuff!!)
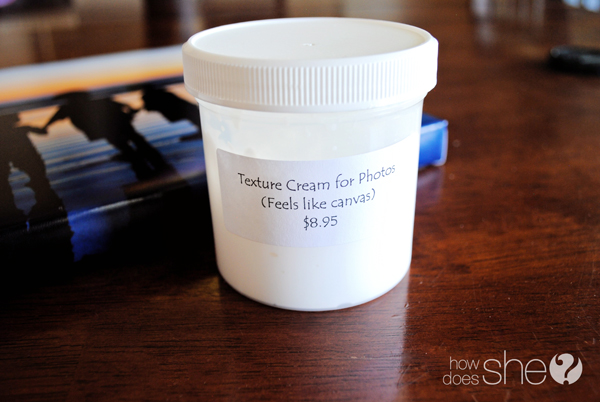
–TEXTURE CREAM or CR TEXTURE COATING If you are in Utah (SLC area) you can go in and purchase a 6oz jar of texture cream for $8.95 at The Wood Connection. Or, you can go online & order 1 quart of the cream technically called CR Texture Coating at gluefast.com for $15.90. (FYI: one 6oz jar will cover approx. a dozen 12×12 surfaces)
–FOAM ROLLER I have used two different kinds of rollers for my canvas’s. A craft roller will give you more of a rough texture and the roller pictured here (I bought it at Lowes) gives a tighter more even texture…I like this look/texture best.
STAPLER any old stapler will do…just a good old home/office use stapler
SMALL PAINTBRUSH & SCISSORS
Instructions:
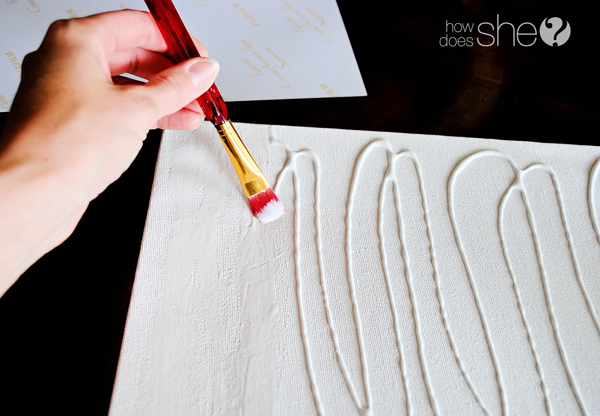
Squeeze the wood glue onto the canvas. Make sure you get a good even coat of glue on there. But not too much…it will bubble your picture. Use your paintbrush to smooth it out.
Be sure to go all the way to the edge of the canvas with the glue.
Next, lay your photo face down on your working surface (make sure the surface is wiped clean). Place your canvas (glue side) down onto the backside of your photo. Center it on all sides.
Grab a credit card or squeegee and smooth it out. Start in the center and work your way to the edges. Work out any air pockets.
This is a bit tricky…try to squeegee your way to the edge. Work your way under the frame, all the way around. Then, turn it over and make sure you can see a smooth surface. Let that dry for at least an hour.
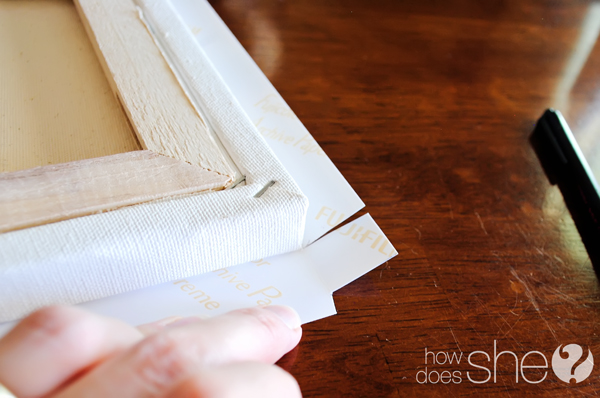
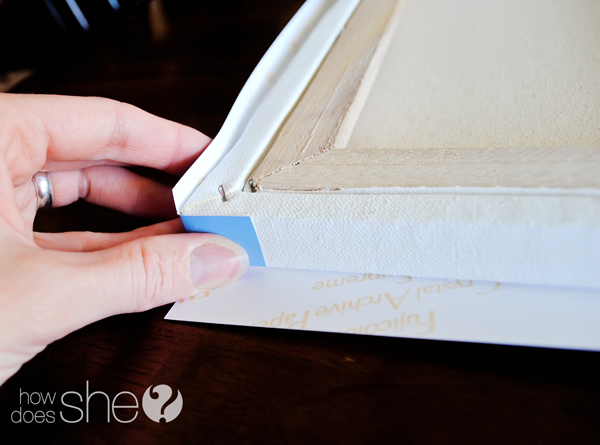
After your top surface wood glue is dry, you can start to fold your photo around the edges and make your crease marks like this:
Next, take your scissors and make your cuts on each corner. (Later on, you are going to wrap your corners and then fold.)
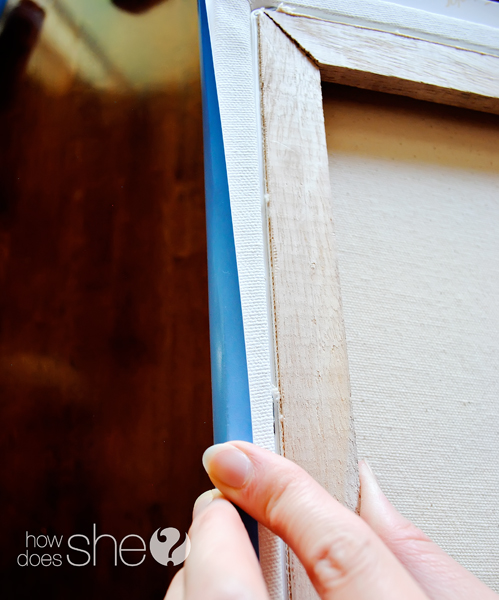
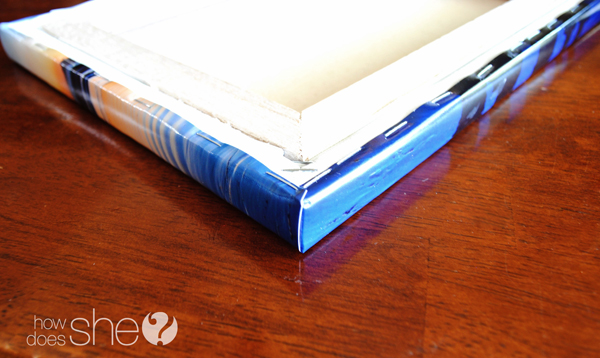
You want the edge of the wrapped flap piece to sit flush with the top edge of your canvas…like this:
Squeeze glue onto the edges of the canvas…spread it out evenly with the paint brush. (note: glue one side at a time…then wrap and staple…then glue the next side, wrap and staple…etc.)
Start in the center and fold the photo over the edge of the frame.
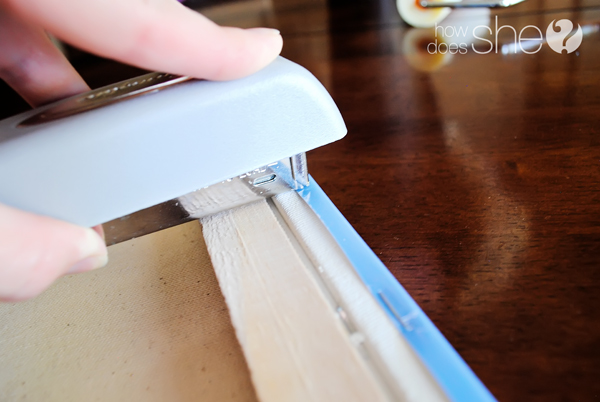
Grab your trusty stapler and staple the photo in place. Staple every inch or so until your first side is done. Then move on to the opposite side.
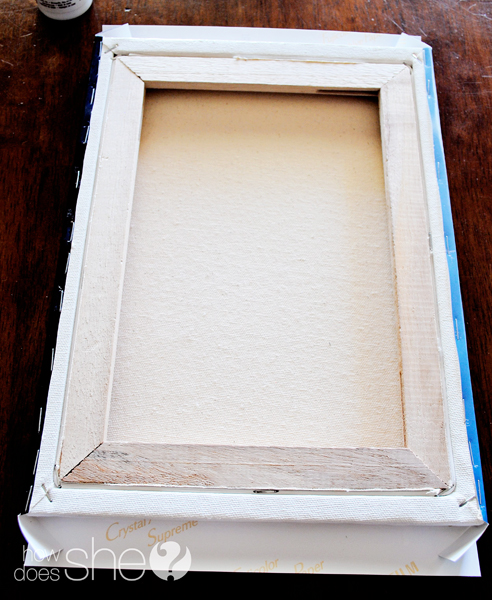
It should look similar to this:
Now for the corners. When you are gluing your two final edges, make sure you put glue under and on top of the corner flaps you are going to wrap. After they are glued down, wrap the photo and staple it down.
Here’s the fun part! The cream!!
Lay down something to protect your work surface and be careful not to get this cream on your skin.
Spoon the cream onto your photo wrapped canvas. Grab your roller and start rolling it out. To ensure that you have the right amount of cream on your photo, start with a spoonful and if you need more add it a little at a time. Roll it out until it looks even.
Don’t forget the edges! It will look similar to this, a little milky…but don’t worry…it dries clear.
It takes a while to dry so put it somewhere safe for a good 12 hours.
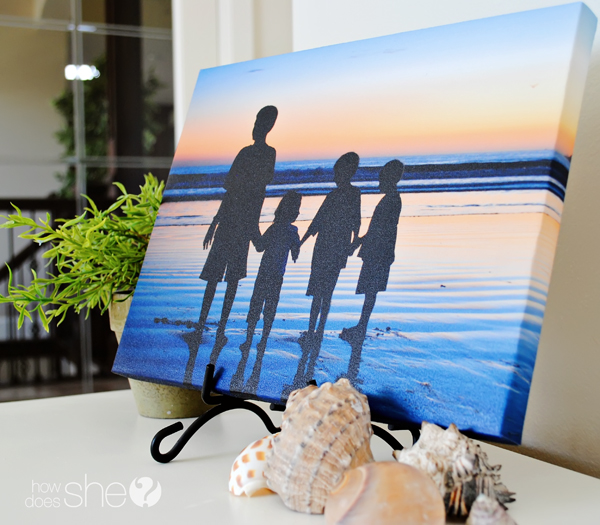
I LOVE how these turned out! They look like the real deal…for a fraction of the cost! Have fun making your own, and with all the money you will save, you can justify buying yourself a new pair of shoes!! 🙂
Happy Canvasing!!
Ready for another fun DIY home decor project? Try your hand at DIY gold foil prints. It’s easier than you think 🙂
Maybe chalk is more your thing? Learn how to make this amazing chalkboard drop cloth hanging sign! LOVE!









Canvas Prints says
Nice tips for creating canvas prints without overcomplicating it.
Shannon says
Hi I’m trying to purchase prints from the imaging depot but I have to choose from glossy and matte , canvas gallery wraps, pearl metallic , and deep matte . Which one works best? Thank you for your help.
Shannon
susan says
Love this idea! This is the best tutorial I’ve seen to imitate the original canvas prints and I can’t wait to try it. The only concern I have is if all of the materials involved are acid free. If not, the pictures will eventually begin to yellow and break down. It will take years for that to happen, but still. I was thinking that mod podge for pictures would be the best route, as it is acid free.
Marva says
I have a cheer team and thus is the last year for several if the coaches. My question is can I write on the canvas print and what type of pin should I use?
Vickie says
Where can you get the texture cream without going online thank you vickie
janet says
i find this to be really easy to follow love it thank you
Jessica says
What kind of paper do the photos need to be printed on?
Genericmav says
i saw some people are using mod podge for the coating, maybe can use as alternative for it
Kaela says
Do you know where I can get the cream locally? I am in Canada. I dont want to purchase it online, I would love to know what store I could go to! Do you know if Walmart carries it? Or Michaels?
Kaela says
Also do you recommend the matte, semi gloss or high gloss finish?
Hector says
Hey, very nice! You just motivated me to try something I have been wanting to do with my big prints for a long time. Thanks for sharing and doing so with such great clarity.
Diane M. Wise says
Loved canvas photo diy!!!!
Kimberly Walters says
HI!
I gave this a try and my photos dry with streaks. My photos are on a semi gloss and I print them on an HP printer. Could that be my problem? Have you heard of this problem before?
Laura says
Your project looks awesome! Got me want going this! So I went on website the one you give out. But I’m not sure which one to print the photo glossy/matte or canvas?
Thank you
Laura
Heather says
Love this! I’ve been procrastinating on looking up how to do this and I can’t wait to try it out!
Lisa says
Hi 🙂 I just came across your site and I’m in love from this one post! I am planning on making some however I am having a hard time finding the texture cream. I am in Australia so the US sites that sell it want hundreds for shipping! What I have been able to find here is mod podge, which I know others have used with success. I have a couple of links, would you please be able to tell me which type would be best to use? Thank you 🙂
http://www.craftonline.com.au/shopping/shopdisplayproducts.asp?id=3940
http://www.lincraft.com.au/catalogsearch/result/?cat=0&q=mod+podge
Dawn says
Lisa, the mod podge in the first link should work just fine! 🙂
Ali says
What can be used in place of the texture cream? Will super PVA adhesive and sealant do the job?
Ashley says
woah ! so creative !
unique southwestern wall art and decor says
An alternative to four blocks is to have printed wall art panels.
Additionally, vinyl wall art can be repositioned if needed so decorating is
fun, not stressful. You don’t have to spend a fortune to decorate your home.
kp says
I have a 24×36 poster that i would like to use for canvas prints.I dont see 22×34 canvas on michaels website.
If i dont get 22×34 canvas then wat would be the next best size that i can use?
nancy says
Perfect! I have the most gorgeous sunset that needs to be on the wall. Thanks for the instructions – and especially the printing site! That’s the most important in my opinon. When it’s finished, I’ll make a post on my website and give you some love!
Erin says
Hey Dawn,
So glad to find a cheaper way of having canvas prints! How do you have the photo printed? I’ll probably go to costco or Target or somewhere, so I’m just wondering what kind of settings I would want to use, in terms of gloss, matte, lustre, etc.?
Thanks!
Dawn says
Hi Erin! I had mine printed with matte or lustre finish.
Hanna says
Great Idea, I was wondering what type of print works best? Matte or glossy or plain 20 lb paper? Thanks for the help!
Dawn says
The matte photo paper will work best.
Dave says
Wow Dawn, exhaustive guide! It shows just how much there is to it really. They look really well made too 🙂
Joe S says
Wood glue is actually easy to find and is cheaper than the tacky glue. You get it in the hardware section or you can even buy it by the gallon at home depot
Dawn says
Thanks Joe! Just be sure to use the white wood glue as the yellow glue may discolor your picture.
janet says
Hello. Brilliant idea and we have shared it for our members on FB. Craft on x
Patty says
Love the canvas pictures.
Bonnie Fulgham says
This is an excellent tutorial. I had never heard of the texture cream. I absolutely can’t wait to try this. Thanks!
Sandra says
I just used the matte mod podge to hold the photo to the canvas AND as the texture on top. It came out great! I’m very happy with it! Thank you for the tutorial 🙂
Marlene says
Hi Dawn – Can I glue paper letters to canvas using mod podge?
Dawn says
Yes, you could glue letters onto the picture but I would be sure to do it before the cream dries.
Lisa S. says
Make sure that you let people know that the texture cream can not be shipped in cold weather as it is a no freeze/thaw product. I was not aware of this and I had wanted to use this for a Christmas present. They really should mention it on the website because now I don’t have the gift that I wanted to give my Father. Very disappointed.
Victoria says
So if I had a 12×12 canvas, would a 11×14 photo be good?
Love this, yours came out amazing. Majority of my Christmas gifts will be these thanks to your awesome idea and instructions!
Darlene says
Have you ever tried this with a poster on paper? I have a poster I want to try this with.
Kathy says
Great job! Does the finished photo look “grainy” or “blotchy?” It appears to I your pictures. It looks like little dots are on the photo. Can you “smooth out” the glue so you done have those dots? Or can you comb it or use different textures? Have you tried this? Would be glad to hear about how you do this.
Dawn says
I have used a paint brush, a foam roller and a a craft sponge. The smoothest texture will be with a foam roller. The more dense your foam roller is, the less noticeable your texture will be.
dawn jungewaelter says
I was wondering if you have ever used decals on a canvas? I want to make a canvas with a quote on it but I am terrible and painting letters please help Thanks
Emily B says
Can you use matte mod podge instead of texture cream?
Dawn says
Yes, you can. It dries a little differently than the texture cream but the finished product looks great with the roll-on texture of the mod podge.
Tabassum says
Hi Dawn, I just love your canvas project. I trying to make a canvas with photo as a gift for my husband in his birthday. Can I make this project of the photo is printed as a poster? actually I went to walmart & they don’t have more than 8 inch/10 inch. So I decided to make the canvas on a poster printed photo. Will that work? Please let me know at your earliest convenience. thanks in advance. 🙂
Dawn says
Generally the poster paper will bubble. If the poster paper is thivk you may be okay. If you do try it, make sure you let the glue dry really well for at least a full day before you add the cream to the top. If you have access to a photo printing store (for a larger photo print) I would probably go that route before attempting the poster paper. Let us know how it turns out! 🙂
Sarah says
Thank you for posting this! I am trying to make our house into a home and have TONS of photos 🙂 I was wondering if you would tell me what your “House Rules” sign says. Love that so much and want to make one. Could you include a tutuorial for that?
Heather Arts says
Hi Dawn,
What sizes are the canvas photos of the two boys and the subway art canvas?
I’m trying to use similar sizes. They look great!
Thanks in advance!
Dawn says
The pictures of the boys are printed as 12×12 and then applied to 10×10 canvases. The Subway art is 16×20.
Mrs. Bee says
This is very lovely and brilliant I might add.
Dianne Moore says
What is primo quality?…Is that a certain type of photo paper? I don’t have a Imaging depot in my area, so can I get this “primo quality” from anywhere else?
Dawn says
Any high quality print will work 🙂
laura@printing-instagram says
Hey, My name is Laura and I blog about tips for displaying printed Instagram photos. I have been doing lots of looking around to find unique photo display ideas and I just want to let you know I love this idea! I love seeing the crafty ideas that people create to display their photos! Thank you for sharing.
Shanon says
I’m just wondering, did you have your picture printed with a matte finish or glossy?
Dawn says
Matte finish
Jessica says
Dawn, do you know the name of the roller you purchased at Lowes? I used a cheap craft roller from Wal-mart and its very uneven. Any suggestions for a good roller from anyone? Things you used that turned out well?
Heidi says
HI! This is the BEST photo canvas tutorial I’ve seen! I LOVE this!! Thank you for sharing!!
Dawn says
Thank You Heidi!
SAM says
Hi Dawn!
Thank you so much for sharing! This is a really great and easy project to do! I just have one really important question, i’m making this a gift for my mom and I need to start it ASAP, but i’m afraid the texture cream will arrive too late, so could I use modpodge, since it is a lot easier to find?
Dawn says
I have not tried modpodge yet…but, I know there a a lot whho have and they have been happy with the results! 🙂
Jackie says
I can’t quite read all the words on your subway art. can you post them, a pic of them or the link where you purchased it? thanks!
Dawn says
The words for my canvas subway art is on pinterest… here is the link: http://pinterest.com/pin/131378514100040445/ Thank you!!
Jenn says
Hi Dawn, thank you for sharing. I cannot wait to try it. I was wondering if you could please post the words on the canvas next to the pictures of the boys.
Dawn says
I found the words for my canvas on pinterest… here is the link: http://pinterest.com/pin/131378514100040445/
NIcole says
What is the difference between texture cream and matte mod podge?
Tiffany says
Michael’s now carries a white texture paint. Do you know if it dries clear and works to give the picture the canvas look?
Dawn says
This is great news!! I haven’t seen it yet. It should say on the bottle how it dries. Maybe try googling it and see if you can get some specs on it.
Carrie says
Just wondering… If they dry and you see little splotches or it looks uneven can you do another coat? Or is it ruined? I made a ton of these at Christmas for family and they turned out awesome. Last night I made a bunch for our house and some don’t look even. It may have been my roller because it wasn’t turning as well. Ideas?
Dawn says
Carrie, I think a thin coat would be fine. I would wait until the first coat is good and dry though. 🙂
Amy says
Will you please share the text on the canvas with your sweet boys? The words seem to be very inspiring.
Beautiful work. Thank you for sharing.
Dawn says
Thank you! I found the words for my canvas on pinterest… here is the link: http://pinterest.com/pin/131378514100040445/
Becka says
Thanks for posting! Do I need to have a backing to glue the picture to beforehand? I asked my husband to just make me frames, but he pointed out that you actually glued the pictures to actual fabric. Just wondering if we could glue and staple the pictures to the stand alone frames and then put the texture cream over it to get the textured look? My husband thinks it wont have the same effect??
Dawn says
Becka, I haven’t ever tried it this way…however I think it would work. They won’t be as thick as the canvas’s…so maybe not as strong but it’s definitely worth a shot! …and it will be a bit cheaper too!! 🙂
Emily says
Hi Dawn,
Thanks for sharing this project. I am making 12 of these for my sons first birthday party, one for each month. Unfortunately I realized after starting a 4×4 size is a little tought to work with 🙁 I have not been able to ceneter all the photos because too much of the main picture gets cut off but I’m looking forward to making bigger ones. Do you have any tips for getting the staples in flat and straight. My stapler keeps slipping…
Dawn says
If you come in off the back edge of the canvas about 1/4 inch with your stapler you should be fine! What a great idea to do a canvas for each of the first 12 months! Darling!
Darlene says
Hi Dawn, Thanks for posting this, unfortunately I tried it and the paper crinkled any suggestions?
Dawn says
Darlene, what kind of paper did you use? If you use a high quality thick photo paper it should work out great. Good luck! 🙂
Tianna says
I was wondering if the texturing cream would make it really difficult to write on? I am planning on doing a diy canvas print as a guestbook for my wedding. However it it is a super rough surface than it won’t be easy for the guests to sign.
Thanks!
Dawn says
Tianna, the surface does have a texture. You could try writing on it, but I am thinking that it wouldn’t be smooth enough to make the writing look good and be legible.
saydee says
Have you done bigger canvases before or known anyone too? I want to do the bigger ones. Do you think it’d work as well? Thanks!
Jenna says
Oh also, do you get the gallery wrap canvas at the image depot?
Jenna says
Hi Dawn! You are awesome! What kind of CR Texture Cream did you get? Hi Gloss?
REBECCA says
HAS ANYBODY USED MODGE PODGE ON THERE CANVAS PHOTO ? AND ANY INFO WOULD BE HELPFUL THANKS
MaryB says
Yes, Mod Podge works! Another site showed directions for making canvas prints with Mod Podge. Tried a small canvas photo as an experiment. Used 3 coats and looks great. Going to make 2 larger canvas prints next. Used glossy photo paper, no problem, even tho matte photo paper is suggested.
abigail t says
HEY! this is so cool! im doing this for a photography project but I was wondering if itll turn out ok if I don’t use the texture cream ?
Hollie says
I absolutely adore this idea!! I was going to ask, how long does it generally take for the texture coating to turn clear? Mine’s been painted with the paste for about 5 hours and is still white (although I did read you say it takes 12 hours to dry fully). I have seen online that some texture pastes dry white, and some dry clear, so I am hoping mine is not a white one, LOL! But if it stays white I plan to put many more photos onto canvas this way, as it looks so fabulous and saves a ton of money 😀 Thank you for sharing!!
launa Vasquez says
Just wondering where you get the texture cream from? dying to try this project!
Ysabel says
Hi!
Do you think spray adhesive or mod podge would work in place of wood glue? I’ve seen alot of variations to this same kind of thing, just wanted to know your thoughts.
Thanks!
Carrie says
These turned out sooo good! I love them. I made them for Christmas gifts for family and they turned out great. Thanks for the step by step instructions.
Canvas Prints says
Agree, great post!
Shawnie says
Hi Dawn!
Love your canvas print tutorial! I am going to make them for the whole family for Christmas this year! Starting a little late so wish me luck! I wanted to ask you about the texture coating though. I went to the website you recommended and wasnt sure if I should order matte or semi gloss. Any suggestions?
Thanks!!
Shawnie
dawn says
Thank you Shawnie! I used semi gloss.
sally says
i was wondering what this texture cream felt like. does it make it feel like canvas too?
Dawn says
It gives the pictures a texture similar to canvas. The texture will vary depending on what you use to apply the cream.
Courtney says
I love this! But was wondering what would happen if you use the yellow wood glue instead of the white. I already had 2 bottles of the yellow and the 3 stores I’ve been too didn’t have any in white.
Dawn says
The white wood glue is what I used. The yellow wood glue might discolor your picture. I have also used Aleene’s Tacky Glue and it works just as well.
Kathy says
Dawn – What type of vinyl letters did you use when you spray painted the canvas black to create the sayings?
B Stroman says
I did three 16x20s today and they turned out great. Thank you very much for clear and detailed directions!
Sheri Jefferis says
Can’t find the Texture Cream in anything but a quart!?!?! Help
Janell says
Can mod podge be used in place of the texture cream? I love how these turned out! They are beautiful. I am definitely gonna give it a go but just wanted to know if you have tried the mod podge. I have about a gallon of that stuff on hand at any given time, I figure it would save me money & time if it works but don’t want to waste the money on high quality printed pics testing it! I’m hoping someone already did that for me. 🙂 Thanks so much for the post. Great work! Make your day fabulous!!
REBECCA says
DID YOU USE MODGE PODGE AND HOW DID IT TURN OUT?
leslie gonzalez says
This is awesome!!! Can i use mod podge for the cream? Thanks!
Dawn says
I haven’t tried mod podge. Im sure it would probably work…you might get a slightly different texture and finish. Try testing it out on a small picture first, definitely worth a try!
Danielle says
I see that you said to order a photo two inches larger than the canvas. I’m having a hard time finding someone who will print an 18×22 photo for a 16×20 canvas same problem if I were to downsize. Any suggestions? I’ve tried Walgreens Walmart and Costco.
Dawn says
Danielle, you would just print a 18×24 photo. Depending on your picture, if the main subject is not near the edges you should be fine…you will just have a bit of excess around the edges of the long side. Or, if you have access to photoshop you can format your picture onto a 18×24 sheet but your actual photo would only be 18×22. Which would mean that you would have a blank strip on each side of the photo when you have it printed. When you wrap the photo the blank sides will be hidden on the back of the canvas. Hope that makes sense! I did this with a friends family photo and it worked out great!
julie says
for the cr texture coating is it matte, hi gloss, semi gloss, matte extra scratch resistant?
Dawn says
semi gloss
T. Murray says
OMG You are awesome!! Just the thought of knowing that there is a site out there that is willing to help others, especially those of us who are craft challenged, is amazing!!
Thank you!!
Charmaine Konoski says
printed primo quality??? I’m not sure what do you mean by that? Matte (Luster) or
Glossy or Pearl or Deep Matte??? I’m not sure which one to pick one. Please help me out… I dying to make canvas of my photos work…
Dawn says
Primo prints are just good quality prints. I used the matte(luster) finish photos.
jaz says
does it matter what kind of wood glue?
Dawn says
The white wood glue is what I used. The yellow wood glue might discolor your picture. I have also used Aleene’s Tacky Glue and it works just as well.
Jenny says
I just ordered the texture cream, and I CAN’T WAIT to make this!! Thank you so much for the wonderful tutorial. I know what everyone is getting for Christmas!
Sheri Jefferis says
Where did you order it? All I can find is the quart and it is expensive to have shipped to me 🙂
Cassie says
Your canvasing editorial was so inspirational. I’ve been looking and searching a way to do this with a favorite picture of mine. Thanks. Your blog is awesome.
Terri says
Loved the tutorial. Definitely will be using it this holiday season. Thanks so much.
Amy says
Saw this post on Pinterest, thought those boys looked familiar. Nice work Dawn!
Dawn says
Hi Amy!! Thanks!
Jackye says
What are primo prints?
Nancy Eha says
Awesome! What type of paper and service from The Image Depot are you using to get great photos that you can put on canvas?
Thanks in advance!
Nancy
Dawn says
Primo prints are just good quality premium photo prints. The Imaging Depot is a local printing company here in Northern Utah that I LOVE!! I have used prints from Costco and they work great too!
Urvi says
What photo prints do you order from Costco, the regular enlargements are too thick to wrap around easily and cleanly. What would you exactly order at Costco
Heidi says
just wondering if it matters if the base of the photo is canvas or not? i’ve seen these projects done with wood base and other things… so does the glue do all the work in making the print look like canvas? or is does it work together with the canvas base to give the look? just wondering if it can be done either way?
Dawn says
Heidi, you can use wood. Depending on what kind of wood you use, you might have to use a craft stapler to staple the picture down after you wrap it. Also, it would be a little heavier to hang on the wall. Totally do-able though!
Carrie says
I love this idea, however, I went to the website and since I live in Canada the shipping will cost me 24.00!!!
Can you recommend another medium for the glue (like modge podge or anything else) or would craft stores like Michaels carry the glue??
Dawn says
Yikes! Bummer that shipping is so high for you in Canada!! Michaels doesn’t carry the canvas glue. I haven’t tried modge podge. You could try rolling it onto a picture and see how it dries. Worth a shot, especially if it saves you $$! Good Luck 🙂
Denise says
Did you end up use mod podge and did it come out good
Lissa Marie says
What an awesome project and it truly does look easy. I know others have asked but is there another medium you can use other than texture cream? I found it online at gluefast.com and was more than willing to pay the 15.90 but was so disappointed to find they wanted over 13.00 for shipping 🙁 I’m going to search my local are and maybe I’ll get lucky and find it!
Deanna says
do you use regular photo paper for the photo enlargement?
Dawn says
yes, regular photo paper works best!
Danielle says
Does it matter if your photo has a matte or glossy finish?
Dawn says
Matte finish works the best
Tina says
so cool~ thanks for the how to info!!
Pictures 2 Prints says
Wow they look great!! Great tips, thanks
Veronica Baxter says
So I’m confused on the primo prints. What does that mean? and is it just regular printing paper? Can i do it at walmart?
Dawn says
Good quality photo paper works best. If you have had photos printed there and have been happy with the results…go for it.
Linda says
Wow–this is absolutely awesome! I haven’t come across a tutorial in a while that made me stop and read through the whole thing. I can’t wait to try this–thanks!
Evelyn says
Love this idea. I wanted to pin it, but there is a problem when trying to include on Pinterest. Anyone else have this problem?
Rebekah says
OMG your photo canvas is AMAZING! You have totally inspired me! 🙂 Quick question – I just checked out the links for the CR texture cream – which version of the cream did you use? Matte, semi-gloss, or high-gloss? Thanks so much for your help – your blog is fantastic!
Thanks 🙂
Rebekah
Dawn says
I used the semi-gloss cream
Abba Bascara says
I looooove it. I will try this at home. Do you know if there are different types of canvas texture cream? Or have you tried any other ones?? Thanks for sharing!!
Renee Givens says
I love the canvas picture and will give it a try. I would also like to know what the subway art in the picture says, it looks awesome. Thanks
Morgan @ A Bright Idea says
This is great, definitely going to try it!
Debra says
This is so great.. Thanks for sharing and for the great step by step photos!
Tanya says
Dawn
I’m not sure I could pull off this project with such Patience to get the result that you achieved. Great result. Lovely photos of your boys.
Tell me what is the source of the lovely positive words in the poster to thr left of your boys portraits? Did you make it yourself? Have you got a clearer photo of it or the URL where I could see it? Let me know. Thanks.
Tanya
nikki says
fantastic! thanks for sharing. i will have to give this a go 🙂
this will be so cool for making our own gifts 🙂
Kara says
I can’t wait to try this! The last picture on this post…did you purchase the black with white text from someone on Etsy?
Dawn says
nope…just copied someone on pinterest! It’s a canvas…I put the vinyl lettering on it and then spray painted the entire thing black. After it’s dry you pull the letters off. (I did the vinyl with my silhouette.)
Lynn says
Love this post. Can’t wait to try it! Also love the canvas with the kind phrases on it… Will you share where you got that??
Dawn says
I found the subway art on pinterest…and just did it myself. But, you can purchase the vinyl lettering at Etsy from Design Divas wall art-Vinyl Lettering Decal – SUBWAY ART -Family rules
Kayla Arrowood says
Ohh wow… Gotta try this!!!! Thanks so much
Elsie says
I so have to do this! I always wanted a canvas print of a really close-up photo of my granddaughter’s face when she was a baby and thanks to your wonderful tutorial I can now make one myself… eh, or try to do it.
The canvasses of your kids are beautiful.
Evelyn says
Awesome! Can you please tell me what size photo I need for a 16×20 canvas? Thanks!
Dawn says
Generally you would print an 18X22…but most photo places offer 18×24. So that is what you will use. If you are familiar with photoshop or something similar you could size your photo to 18×22 and then have it printed as an 18X24. There would just be a blank strip on each side of your actual photo…which wouldn’t be seen after you wrap the edges onto the canvas. You’ll also have a little more to play with when you are stapling!
Ann says
Did you have the photo printed on photo paper or canvas?
Gina says
Absolutely FABULOUS!!!!!!!!
Edulina says
Hi, where can I get the texture cream for the photo. Does it sell under any other name? I am from Namibia and we find it difficult to buy all the stuff needed for creative ideas like this.
Reuben says
I found a web site that seems to fit the bill quite nicely:
http://www.binding101.com/canvas-texture-coating-kit.html
Laura says
Why wood glue? Can something else substitute? And they look awesome! Thanks!
Dawn says
Laura, I actually just tried Aleene’s Tacky Glue…it comes in a gold bottle. It works just as well…and it’s easier to find! 🙂
Krystalin says
could you use modpodge?
Shirsha says
This looks really awesome. I have put up pictures on canvas using ModPodge. But I never knew about texture coating – will have to see if I get it here.
Christina says
THANK YOU for this amazing idea. They turned out great. So much better than the framed photos. I want to thank you for the GREAT tutorial. I need pictures! Keep up the amazing work!
alison@howdoesshe says
Dawn I love these. I’ve seen these up in your house and I think they are wonderful and look so professional. I thought that you had them done professionally! Thanks for sharing your secret and posting pics of your kids!!
Dawn says
Alison you are sweet! Thanks. Really, these canvas’s are so fun to do! 🙂
Missy says
What a great idea! Those pictures of your kids are adorable. 😉
Dawn says
Thanks Missy!
jessica says
Where do you get the texturizing cream at? Do you know what brand it is? It looks amazing!
Dawn says
In the beginning of the post there are a couple of links that will take you to where you can get the cream.
Heather Lynne says
Cool!!!!